20 Easy & Simple Nail Art Designs To Do!
Spending your summer in quarantine? Time to bring out your creative side and create something interesting. What better way to do this than DIY nail art easy design? Whether you want to opt for detailed stripes or florals, we have the best nail art designs for you, all with complete step-by-step instructions. This simple DIY nail art designs step by step are super easy and definitely not impossible to accomplish. So let’s dive into some of the nail art easy designs!
Simple Nail Art Designs
Want to give your nails a new definition of beauty? Scroll below to get a scoop of some of the most amazing simple nail art designs that are actually easy for you to try out!
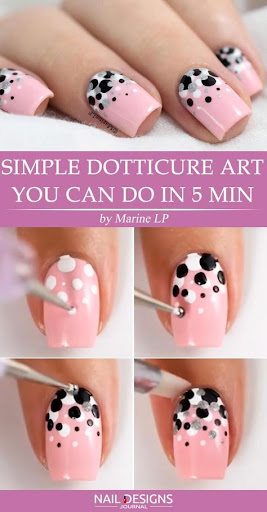
Dotticure Nail Art

Link: https://in.pinterest.com/pin/639018634616142529/
If you’re looking for something simple yet elegant, a dotticure manicure nail art easy design seems like the best nail art design.
Step-by-step tutorial:
Step1: Apply a base coat
Step 2: Now apply two coats of your favourite pink nail polish. Let that dry.
Step 3: Using a dotting tool (three different sizes) create a cluster of spots. This can be done using three different shades for better results.
Step 4: Finish it off which a thick layer of top coat, let that dry and you’re good to go
Realistic Amethyst Nail Art

Link: https://in.pinterest.com/pin/617345061402215577/
If there's one thing that's gaining tremendous popularity, it is the amethyst simple nail art design. These look a little tricky but they also give you an opportunity to get creative with your own nail art designs. All you need is some lilac or violet nail paint and a few hours to experiment. The violet quartz stone is usually utilized in jewelry and residential decor — and it definitely makes a statement when translated to a nail art design. When you’re looking for something elegant and chic, definitely give this one a try.
Step-by-step tutorial:
Step 1: Apply a base coat
Step 2: Apply 2 coats of your favourite lilac nail lacquer
Step 4: Apply a thick layer of top coat
Step 5: Place a few drops of a deep purple shade
Step 6: Now place a cling wrap over your nail and gently dab it so that it forms a beautiful marble effect
Step 7: Using a nice shimmery gold shade and a fine tip nail art brush add a little bit of detailing to it
Step 8: Top it off with another layer of top coat. Let that dry completely and voila
Watermelon Nail Art
Link: https://www.thenailasaurus.com
We love watermelons? Don’t we. This thirst-quenching fruit is so colourful that it can definitely be a part of nail art designs this summer. The colours used are so fresh, that we’re literally craving watermelon juice right now.
Here’s how can you can perfect this watermelon simple nail art design at home.
Step-by-step tutorial:
Step 1: Apply a pink base polish and wait for it to dry
Step 2: Using a fine tip nail art brush and green nail polish, paint a border around your nail leaving the tip
Step 3: Draw a white line between the two colours using a white polish and a nail art brush.
Step 4: Dip the tip of your brush in to a black acrylic paint and simply press down once to create each seed
Step 5: Add a thick layer of top coat and clean up around the edges using pure acetone on a clean-up brush
MyGlamm Recommends:
Stripe Magic Simple Nail Art

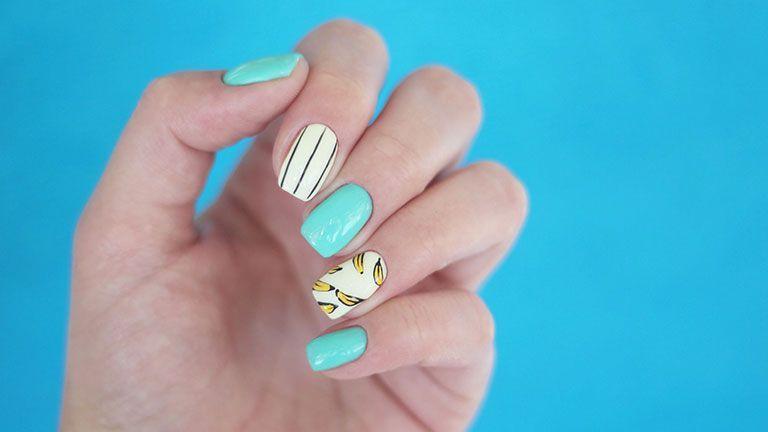
Though stripe nail art hasn’t gained enough popularity, it’s one of the classiest DIY nail art designs you’ll ever find. Scroll below to know how to make this simple striped nail art step by step!
Step-by-step tutorial:
Step 1: First, start with painting the nails white.
Step 2: Cut out small metallic black tapes and stick them on your nails to create a pattern. (Cut down the extra bit).
Step 3: Lastly, finish off the nail art with a protective top coat.
Glitz & Glam Simple Nail Art

For nights where you need a glitzy effect on nails while also keeping it subtle, this easy nude nail art design is for you. Scroll down to get an idea of how to do nail art in this style:
Step-by-step tutorial:
Step 1: The first step to start making this design is by painting two nails first.
Step 2: Paint one nail shade with a nude shade while the other in some glittery shade.
Step 3: You can keep it either way where two nails can either be fully nude or the rest of the nails can be glitter-studded.
MyGlamm Recommends:
Wanderlust Sand Matte Nail Polish Set of 2
Neon Tips Simple Nail Design
There’s nothing that a neon flush of colour cannot fix. This neon tip easy simple nail art design is sure to inspire all the fashionistas!
Step-by-Step-tutorial:
Step 1: Start by painting a shiny transparent base coat on the nails.
Step 2: Then with the use of a precise nail paint brush, paint the tip of your nails in the neon shade of your choice.
Black Doodle Nails
The cute magical doodles you’ve been drawing on the back of your notebooks have finally got a chance to show up on your nails. So take your doodles game a level higher with this simple easy nail art design!
Step-by-Step-tutorial:
Step 1: Start this simple easy nail art design with a clean nail canvas.
Step 2: To ace this simple design, draw easy flowers & leaves in black nail colour using a fine brush.
MyGlamm Recommends:
MyGlamm Two Of Your Kind Nail Enamel Set - Casino Night
This is an amazing nail enamel set which is a long-lasting nail enamel set with a duo of two striking shades - black and white.
Gothic Simple Easy Nail Art
It’s time to infuse the goodness of gothic vibes into your nails! Try this simple nail art idea and give a new definition to your nail look!
Step-by-Step-tutorial:
Step 1: The first step to creating this nail design is by painting the base of your nails in a black matte shade.
Step 2: Pick maroon shades & draw your favourite gothic patterns on the top.
Step 3: Finish off the look with a protective top coat.
Rainbow Simple Nail Design
This rainbow simple nail art design is for all who want to take the no-fuss route and make their nails look super cute.
Step-by-Step-tutorial:
Step 1: To start with this simple nail extension design, all you need to do is keep your rainbow nail paint bottles ready in one place.
Step 2: Paint each nail in a different nail shade and that’s it!
Nude Nail Art Easy Design
For the minimalist divas out there, finally, there’s a dope nude simple nail art design for you!
Step-by-Step-tutorial:
Step 1: The first step to start this design is to simply paint a transparent base coat.
Step 2: The second step is to choose a nude pink shade and paint the nails in the same colour.
Step 3: To add some oomph factor to this nail design, you can also draw a stripe in a contrasting shade.
Pink-Purple Floral Simple Nail Polish Design
Does the combination of pink & purple look pretty as hell to you too? Quite a classy simple and easy nail art that’ll instantly brighten up your nails.
Step-by-Step-tutorial:
Step 1: The first step to start is to apply a base coat on the nails.
Step 2: The second step is to paint nails in pink & purple nails alternatively.
Step 3: With the help of a thin brush, draw a little flower on a single nail. Doing this step will add an oomph factor to your nails.
Colour-Splash Simple Nail Design
One of the most beautiful nail art easy designs is this colour splash nail art. All you got to do is splash some colourful nail paints on a white base. Isn’t that easy!?
Step-by-Step-tutorial:
Step 1: The first step to start this nail art is to apply two coats of white nail paint for a solid base.
Step 2: Once it dries up, take nail paint colours in a fine brush by dipping and then splash those on the nails using your thumb.
Step 3: At the last, set your nail polish with a top coat.
Minimalistic Yellow Vibes Simple Nail Art
There’s no denying yellow is quite a happy colour. To give your nails that subtleness & brightness, try out this soft simple nail art design for yourself.
Step-by-Step-tutorial:
Step 1: The first step is to pick your favourite shade from the yellow colour family.
Step 2: Next, paint your thumb, index finger and little finger in a yellow solid colour.
Step 3: You can either leave the middle & ring fingers plain and simple or paint their tips yellow.
Red Heart & Tip Simple Nail Art Design
Do you want to give your red nail paint a try and paint your nails in the simplest way? Without a doubt, go for this simple nail polish design.
Step-by-Step-tutorial:
Step 1: The first step is to start with a base coat on the nails.
Step 2: Next, the colour red at the end of the tip of the nails and draw a little cute heart on the other side of the nail.
Step 3: Repeat the same process for each nail and you’re good to go.
Green Marble Simple Nail Design
Marble nails simple nail design is quite a trend now. To make your nails stand out, give this amazing nail design a try!
Step-by-Step-tutorial:
Step 1: The first step is to fill a cup of water and add a few drops of your favourite 2-3 nail paints.
Step 2: Then with the help of a toothpick, start moving it on your nails in different directions for that sexy marbleized effect.
Step 3: Once you achieve the desired pattern, dip your finger and clean the excess polish using a cotton ball.
Spring-Time Simple Nail Art
Summer vibes are ringing in and it’s time you save a beautiful daisy-springy nail art for yourself! This simple easy nail art is sure to speak volumes in the crowd.
Step-by-Step-tutorial:
Step 1: Paint your nails in a springy-green colour as the base of your nails.
Step 2: Pick a toothbrush, dip it into white nail paint and draw little flowers on the base.
White Heart Tip Simple Nail Design
It’s not the real truth that heart-shaped nail design is only meant for Valentine’s day. You can also try your hands on this white heart tip simple nail art idea.
Step-by-Step-tutorial:
Step 1: Cut your nails in an oval shape and apply a transparent base coat on each nail.
Step 2: Draw a heart-shaped design at the tip of the nails in white colour paint.
Minimal Stripe Simple Nail Art Design
There’s always an extra mark for subtlety and this simple nail art design proves it!
Step-by-Step-tutorial:
Step 1: The first step is to paint the base of the nails in a pastel pink shade.
Step 2: Next, place the tape in golden colour either horizontally or vertically on the top of the nails.
Leopard Print Simple Nail Art
This is a callout to all cheetah girls! For every girl who wants to go the wild yet easy way, do try out this superb simple nail art.
Step-by-Step-tutorial:
Step 1: To nail this uber-chic nail design, apply a lavender base coat of nail paint.
Step 2: Next with the help of a fine brush, draw little leopard black & golden patterns on top of it.
Half-n-Half Simple Nail Design
A combination of two pretty hot colours on nails has the power to make you flaunt them like a boss queen. Pick two of your favourite nail paint colours and take your nail game a level higher!
Step-by-Step-tutorial:
Step 1: Start this design by dividing the two sections of your nails either horizontally or vertically.
Step 2: Paint both colours on each nail in a half-n-half pattern to amp up the look. Guess what? It’s done!
Read More
Fall in love with these fall nail art designs: Ready to fall in love with some gorgeous nail art designs? Here are some ideas you should definitely check out!
Ombre nail art designs: Hit the link for some pretty-looking ombre nail art designs!
Bridal nail art designs: Wedding day is near? Don’t fret! We’ve got some amazing-looking bridal nail art designs for you!
Pink and black nail art designs: Pink and black combination is the new trend. If you also enjoy painting this combination, we’ve got some design ideas for you!
Gold nail art designs: Get ready to bling it on with these fabulous-looking gold nail art designs!
French manicure: Bored of regular manicure? For a change try this french manicure, hit the link.


